Want to start a blog / website and make money online in India? Everyday, you consume news and articles from a wide range of websites and blogs on the Internet. Who runs these websites and creates the content consumed by the global audience?
Many of the popular websites are owned by large media houses employing large teams of journalists and content writers. Interestingly, a vast majority of the websites on the Internet are owned and run by individual bloggers and content developers. You too can start working as a profession blogger and start earning a decent income working from home.
In this article, you will learn everything about how to start a blog or website to make money online. You will learn how to find the right niche/subject for your website, register a domain name, purchase web hosting for cheap, build your website, publish content that attracts traffic and, eventually, start earning money from home through your blog/website.
It’s going to be a long article. So, get yourself some tea and snacks before you proceed. Who said making money is easy? 🙂
Blogging for Money: Steps for Successful Blogging
What are the basic steps involved in creating a blog (or website) and making money online in Inida? Here’s a rough outline of the process involved in starting a website from scratch and making it a huge success.
- Choose a profitable niche/subject
- Register a catchy domain name
- Purchase web hosting for website
- Install website platform for publishing
- Publish high-quality content
- Promote your blog/website
- Monetize your website
Step 1: How to Select the Niche for Your Website/Blogging?
The first step towards starting as a successful blogger or online content entrepreneurship is to understand the demand for content on the Internet and create a plan for your blogging. Professional blogging is not simply writing random article at your whim and fancy. Before you start blogging or creating your website, you must conduct a market research to understand what type of content gets maximum traction (views) on the Internet.
Try to find out what type of content gets the maximum number of visitors. This is crucial as writing about a topic that barely has any demand among Internet users means your efforts will not yield the results that you desire for making money from blogging.
What is the subject/topic that you understand well and have a keen interest in? Take a pen and a sheet of paper and jot down the subjects that interest you.
Is it sports? Do you enjoy politics? Do you always read about science or mathematics? Are you good at fashion or beauty? Do you really enjoy cartooning? Are you a yoga expert? Do you have great knowledge of home remedies or Ayurveda? Do you like food? For the purpose of this tutorial, we will consider Ayurveda as our main subject.
Now, go to Google and try searching for topics around your subject. Explore the content and websites already published on the Internet. Ask yourself if you can create a website that’s better than the existing ones or add value to the Internet publishing something unique, maybe just an interesting angle to a dull subject.
Now, conduct a keyword research to find what are the topics that people search for in that niche. For keyword research, you can start with Google Adwords Keyword Planner. Though Google Adwords is for advertisers, you can use Keyword Planner to find statistics such as search volume data for keywords, find new keyword ideas, etc. Using the average number of searches for niche keywords, we will have a fair idea if there are lots of people searching for content and information around our subject. If there are lots of people looking for information, we have a big target audience and a better chance of success.
Register a Google Adwords account and go to Tools > Keyword Planner. Now, click on the “Search for new keywords using a phrase, website or category” option and enter a broad keyword. For our example, we will search for keywords around Ayurveda. Google Adwords will provide a range for average search volumes for related keywords. For a more detailed information on search volumes, you will have to set up and run a campaign (don’t do this as we are not going to run ads). You will also find the CPC, or cost per click, for each keyword. The CPC is the suggested cost that advertisers are recommended to pay for each click on their ad for that keyword. It is a suggestion and the actual CPC can be way lower.
What should be the search volume? For a successful general website, I personally want a topic which has at least 10,00,000 searches per month across different keywords. If there is a significantly large volume of search, it is easier to grab more visitors and make good money.
What should be the potential earning per click? You should also look at the keyword cost-per-click that advertisers spend when advertising for that particular keyword. A higher cost per click means a better income potential for each click.
You need to find a balance between volume and cost per click. A large volume with an average cost per click of $.25 can be better than a keyword with just 1000 monthly searches and cost per click of $5. If the subject has a high cost-per-click, say $25, you can also consider a niche with lower search volume.
The income of a website will also depend on the location of the users. If a website has visitors primarily from the developed countries, the income potential is higher.
Generally speaking, the average income for websites with primarily US-based traffic is $5-10 per 1,000 visitors. If the website gets visitors primarily from India, the income per 1,000 visitors is around Rs 100.
You can get a rough estimate of the income potential by assuming you get 10% of the search volume and that only 1% of your visitors click on ads. The cost per click multiplies by the search volume divided by hundred is the potential income that you can generate by creating a successful website on that topic.
Create a list of keywords for creating content once the website is ready. Organize these keywords according to priority and organize them in categories for a easy-navigation and reading archive. Jot down 3-10 broad categories (and sub-categories) for organizing your content based on the niche.
Step 2: How to Select the Domain Name for Your Website?
Once you have finalised the niche/topic for your blog website, it’s time to register a catchy and brandable domain name.
What’s a domain name? When you try to visit a website, you type the address in the URL address bar of the web browser. Eg: Google.com. A domain name is an easy to remember address of the website.
You can register a domain name from any reputable registrar such as Godaddy, Net4.in, or directly from the web hosting provider. To keep it easy, you can register the domain name with the web hosting provider itself.
Make sure that your domain name is a .com domain. If you are creating a website specific to a country, it can be in the primary domain extension of that country, eg: .in or .co.in for an India-centric website.
You domain name should be short, catchy and convey the topic that it is about. For instance, our ayurveda website can have the domain name ayurvedaspot.com or ayurvedadb.com or ayurvedayard.com.
Step 3: Purchase Web Hosting for Website
All websites are hosted on a web server, which is a computer connected with the Internet for others to access it. You need to place all your website files, scripts and website platform on your web server. When someone requests to view your website or a page on it, the server processes the respective files and sends the relevant webpage to the browser of the user.
Web servers are identified by IP addresses, which are long numeric identifiers. These IP addresses can be used to access a website, but it’s ugly and difficult to memorize. That’s when the domain name comes to rescue. This way your website visitors can access your website with a human-readable address, eg: earnmonyonlineindia.com.
You need to ensure that your website domain name points to the IP address and name servers of the web hosting server where your website is located. If you have registered your domain name from your hosting provider itself, the domain is already configured to the appropriate web server location where your website files are stored.
Where to buy web hosting? For a new website, the space and computing power required to host the website is low. You can buy cheap, shared web hosting from providers such as Hostgator and Bluehost. It will cost you a few hundred rupees per month. As you are starting out as a professional blogger, you might want to stay prepared to host a few other websites in the next few months. So, it is recommended that you buy the web hosting package that offers unlimited space/bandwidth and the ability to host multiple websites on the space package.
Don’t have money to buy web hosting? Start with free Blogger.com blog. If you want to start without investing a dime in web hosting, go to Blogger.com and set up your domain with a free Blogger/Blogspot blog. Once you have created a free Blogger blog, you can go to the settings options and add a custom domain (the domain that you have registered for your website) with it. The process is fairly simple, which requires modifying the name server (CNAME & A Name records) and create a custom name server entry as directed by Blogger.com settings. You can find the detailed guidelines at your domain registrar or look for the support instructions provided by Blogger.com.
A free Blogger.com blog will have some limitations when it comes to customizations, but it should be good enough to start. You can always switch from free Blogger.com to your own-self hosted website anytime in the future.
Step 4: Install Website Platform
If you have opted for your own hosted website and purchased web hosting, you need to install a website platform that will power and run your website. One of the most popular website platform is WordPress (available at WordPress.org, not the hosted service provided by WordPress.com). It is free and very easy to use.
If you have purchased hosting and domain separately, you will have to configure your domain to work with the web hosting. When you buy web hosting, your provider sends you the name server (NS) details that your domain should point to. Log in to the dashboard for your domain registrar and update the name server entries to the ones provided by your hosting company. It takes a few minutes to hours for the change to get reflected.
Before you proceed, create a new email address with your domain name. Log in to your web hosting cPanel, and create a new email address such as contact@myawesomedomain.com. You can then configure the email to an email client such as Outlook or Thunderbird. Alternatively, you can configure Gmail account to fetch emails from this new address directly from your email server. You can also simply redirect the new email account to another email account that you use as your primary email address.
Install WordPress using Quick Install: You can install WordPress with a few clicks using your web hosting cPanel. Log in to the web hosting cPanel dashboard and locate the Quick Install option. Now, on the new page, select WordPress option. Follow the wizard and your WordPress platform will be installed on the server. Make sure to use the email address that you created with the new domain.
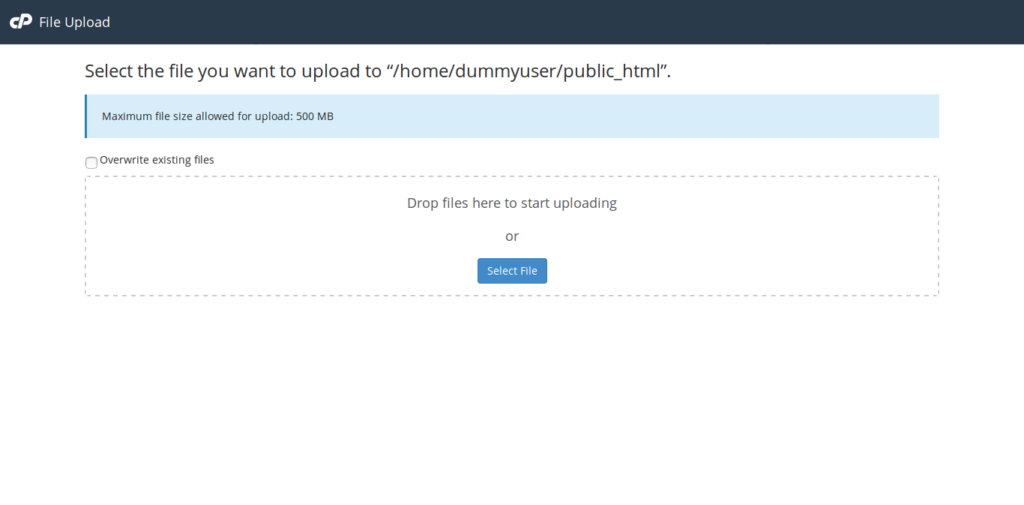
Manually Install WordPress: Alternatively, go to WordPress.org, and download the WordPress platform ZIP file. Now, using cPanel > File Manager, upload the WordPress ZIP folder to the main/root folder (called www or public_html) of your web hosting space.
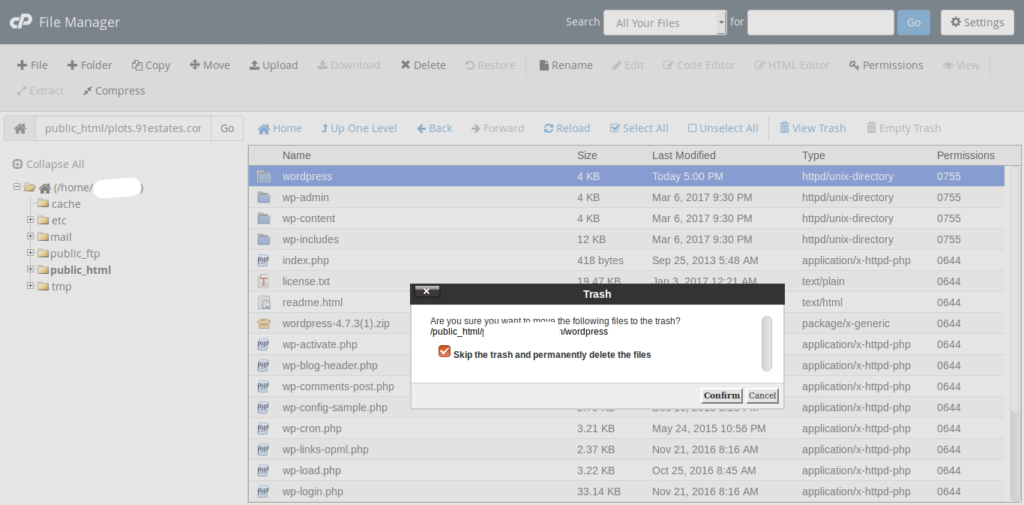
Now, unzip the archive folder using the Extract option available with the file manager. Simply select the ZIP file and click on the Extract option at the top of the file manager page. It will create a folder called “wordpress”.
Currently, the WordPress script is accessible at a sub-folder of your website. Enter the new “wordpress” folder, and select all files and folders. Move them all to the root folder by selecting the move files option and choosing “/” or “www” or “public_html” as the location.
Now, go back to the main root folder. You will find all the WordPress files and folders here. Delete the “wordpress” folder as it serves no purpose now. You can also delete the WordPress ZIP folder uploaded initially to save hosting space.
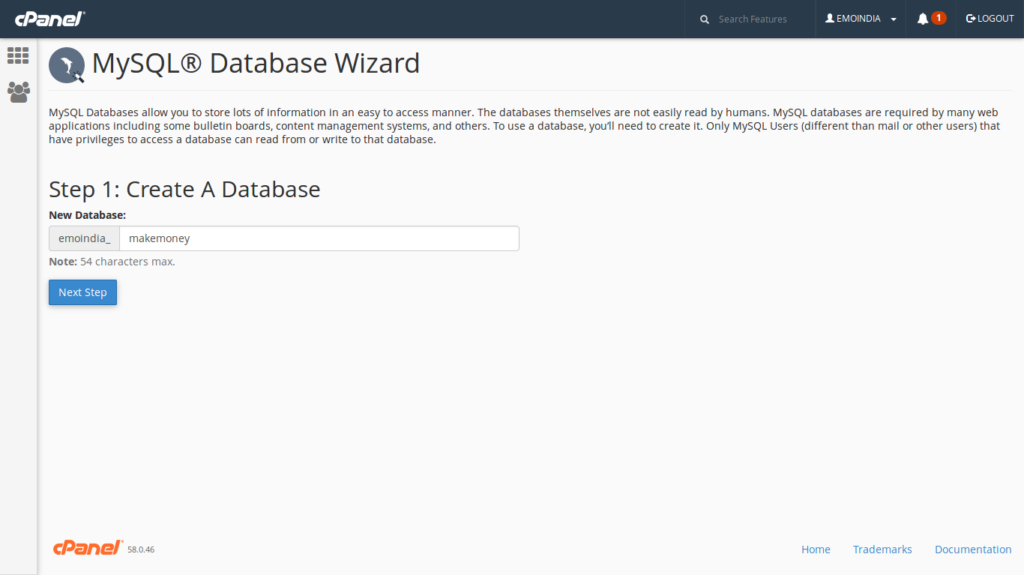
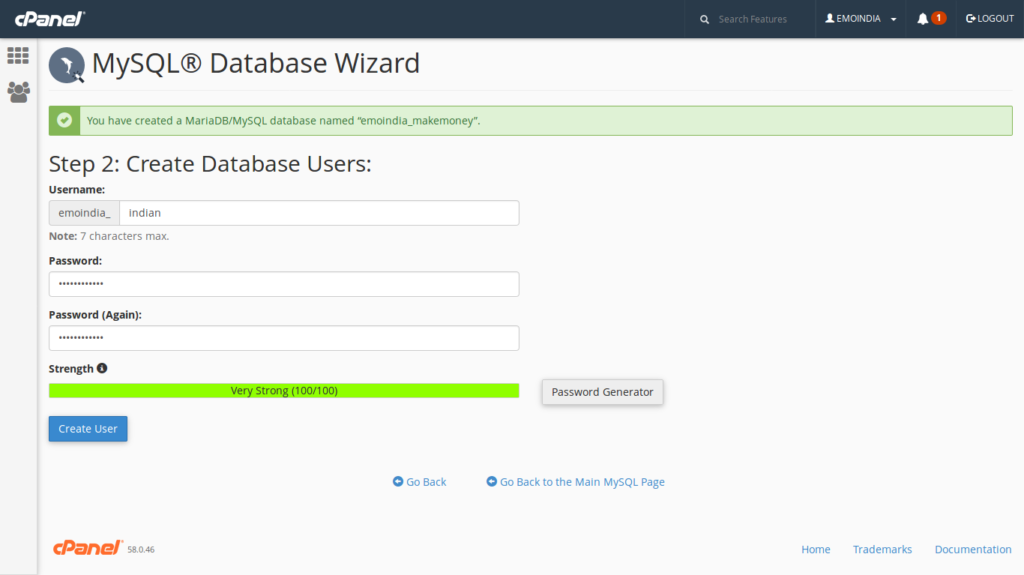
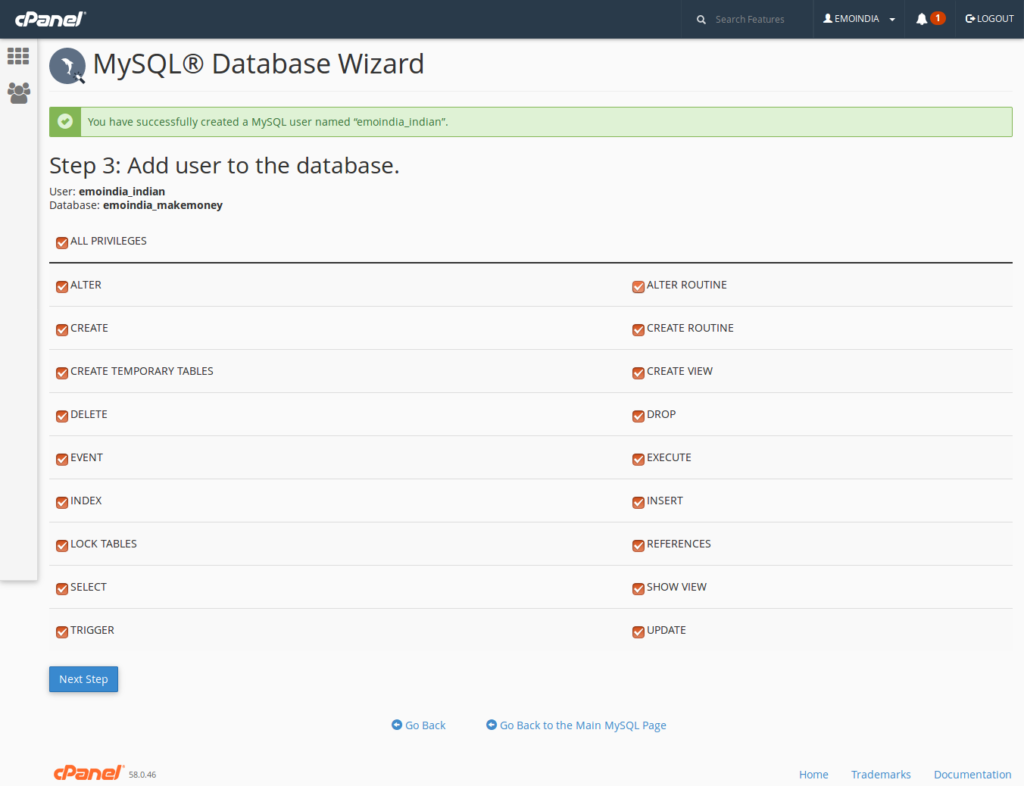
Now, go back to the cPanel and create a MySQL database, add a database user and link the database user with the database. Use the MySQL® Database Wizard to easily create the database, user and link the user with database. Make sure to select “All Privileges” for the user. For password, use the password generator and note down the password safely on your computer in a text file.
Open a new tab in your web browser tab and type the domain name of your website. You will be taken to the WordPress installation wizard if you have followed the steps correctly. If you don’t see anything, please wait for a while so that the domain and web server are linked properly and try again. Enter all the details along with the database name and database user name and password. You will have your WordPress website installed.
Now, access your WordPress dashboard to customize the new website. Your WordPress dashboard can be accessed via yourdomainname.com/wp-admin/
Now, make the following changes to your WordPress website without delay.
- Go to Settings > General and change the website tagline/description from “Just another WordPress site” to something that’s relevant to your website. For our ayurveda site, we can call it “Ayurvedic treatment and remedies for health”.
- Go to Settings > Permalinks and select the “Post name” option, or add a custom structure that contains the post slug and the post ID at the beginning or the end.
- Delete the dummy post and page that comes by default with new WordPress installation.
- Create the Categories and Sub-Categories (with a main category as the parent) in your new WordPress website. For this, go to Posts > Categories. You have already created a list of categories for organizing your content during the keyword research.
- Add an “About” page and add some content (at least 100 words) that describes your website.
- Add a “Contact Us” page and provide your correspondence address, email address, phone number.
- Add a “Terms & Conditions” page. You can take ideas from the terms page of other websites or use an online terms and conditions page content generator.
- Add a “Privacy Policy” page. You can take ideas from the privacy policy page of other websites or use an online privacy policy page content generator.
- Now, add a menu with the pages and categories. Go to Appearance > Menus, and create a new header menu with all the categories and sub-categories (keep them under the main category). Add the pages to the main menu or to the secondary (maybe, footer) menu, depending on the menu locations supported by your WordPress theme.
- Add the Yoast SEO plugin via Plugins > Add New. Use the Yoast SEO plugin for SEO settings of each article, and the website in general. Also, use it to add the Sitemap to the website. You can add the Sitemap URL link to the footer or secondary menu. I personally remove the /category/ from the category URLs using the Yoast SEO option to strip this portion of superfluous text from category URLs.
- Add a contact form plugin such as Ninja Forms and create a new contact form. Add the contact form to your contact page.
- Install WP Superchache plugin. Don’t activate it right now. Do it when the website is ready for users.
- Find a good WordPress theme that suits your website niche and install-activate it on your website. You can find new themes via Appearance > Themes > Add New. Explore the themes and install it. Then activate the theme for use.
- Create a header logo for your website. You can use Photoshop, GIMP or any free online logo generator. Upload the header to your site using Appearance > Header.
- Add logo and site icon (512px wide and 512px tall) to your website via Appearance > Customize > Site Identity.
- Go to Google Analytics and add your website there for monitoring the number of visitors to your website. You will be able to see what pages work well, where your users come from, what are the keywords that drive traffic, how long your users stay on your site, and much more. Use this information to actively manage your website and for creating content strategy.
- Create a Google Webmasters account and add your website there as well. It will allow you to keep a track on the performance of your website. Link your Google Analytics account with the Google Webmasters account for better tracking.
Step 5: Publish High-Quality Content
Once your website is ready, you need to start publishing useful articles related to your selected niche.
In the keyword research earlier, we created a list of keywords for our website content. You must have at least 100 broad keywords related to your niche ready before proceeding. Create an outline for articles around all the keywords and organize them according to priority.
Create a publishing plan so that your website has at least one new article (at least 500 words long) published each day for the next 30 days. For successful blogging, it is very important that you keep publishing high-quality articles as frequently as possible. You can reduce the frequency when your blog matures, always publish a new article once a week or every month. This keeps your website fresh and helps improve your website ranking.
When creating content, make sure that your title includes the primary keyword. Also, add the primary keyword in the beginning sentence or paragraph of the article. Add the primary and secondary keywords (keyword variations) in sub-heading as H2 or H3 tags in the articles. Keep your articles with short paragraphs, adding lots of meaningful and catchy sub-headings. Try to write comprehensive articles with long body text that covers everything around the target keyword. Add interesting images, infographics and highlight boxes using the Blockquote tags. If you can create videos, make sure to do so for your new website. Publish the videos on YouTube with a link to your website in the video description. Embed the videos to your articles.
Step 6: Promote Your Website
Marketing and promotion is important for success of any business, even for blogs and websites. With millions of websites on the Internet, people need to be made aware about the existence of your website.
Use Social Media: You should create Facebook Page, Twitter account, Instagram account, etc for your blog. Share your website articles, interesting videos, images, etc on these social media website platforms. Ask your friends and family to like/follow your website on social media. Try to share as much as possible on social media. Make sure that you share all your articles on Facebook, Twitter, etc as soon as you publish.
Forums, Groups & Blog Comments: Join as an active member on forums, Quora, Linkedin, social media groups and Facebook groups pertaining to your website niche. Provide value to the existing discussions and also promote your website when relevant. Reach out to fellow bloggers and share your comments on their blog posts.
Genuine Guest Blogging: If you are new to blogging, you need to build some trust and credibility. Write super-awesome articles related to your niche and offer them to fellow bloggers. Simply add a link to a relevant article webpage on your website within the content. Be honest and up-front about your guest post requests. Always offer the best content to your fellow bloggers so that they find it useful to publish.
Social Media Advertisements: If you have a budget, make sure to experiment with paid advertising. Spend some money promoting your best content on Facebook, Twitter, etc. This brings quick visibility to your website and also help generate likes and followers on social media.
Step 7: Monetizing Your Website
Our objective is to earn money through blogging and website content. So, this is the topic that you want to know in great detail. Ironically, making money online through is less about monetization techniques and more about creating content that drives hordes of traffic.
How much money can you make blogging or content-centric websites?
Now, there is no sure shot estimate for how much you can earn through a blog. The exact earning will depend on the niche of the website, location source of traffic and the volume of traffic. It also depends on the niche as visitors in some categories are ad-blind, which means they are less likely to click on ads. Generally, topics where the target audience is less tech-savvy are more likely to click on ads.
Successful Indian bloggers make Rs 1,00,000 (Rs 1 Lakh) to Rs 10,00,000 (Rs 10 Lakh) per month through advertising and affiliate marketing through their blog websites. An average full-time blogger in India would be earning Rs 15,000 to Rs 50,000 per month. Successful international bloggers claim revenues as high as US $100,000 per month (about Rs 65 Lakh per month).
On an average, Indian blogs where the main traffic source is from Indian visitors will earn close to Rs 50-100 per 1,000 visitors through Google Adsense advertising. So, to generate a monthly revenue of Rs 50,000, you need a traffic volume of 5,00,000 in a month. That’s 16,500 pageviews per day.
If a website has traffic coming from developed countries, the average revenue is $5 per 1,000 visitors via Google Adsense. About 5 times the income potential of a website with Indian traffic. So, a website with monthy traffic of 100,000 can expect to earn $500.
Don’t bother about website/blog monetization until you start getting 100-1,000 visitors per day.
Yes, do not start showing ads on your website until you get a good traffic volume. If your website is in a niche with low traffic – high ad cost per click, you can place ads after reaching 100 visitors per day. For more general websites, wait until your website starts attracting 1,000 visitors per day.
Wait for at least 3 months before applying for a new Adsense account.
Google Adsense is the easiest and most popular contextual advertising programme for websites. Don’t rush to get a Google Adsense account. Wait for a few months until your website has matured a bit and has a substantial number of high-quality articles. I would recommend you write at least 50 articles on your article before applying for the advertising programme with Google Adsense. If Adsense does not find your website good or with just a few articles, you are more likely to be turned down. Once you get your Google Adsense account approved, make sure that you never click the ads or even promote anyone else to do so. Google is very strict about such fraudulent activities and will kick you out if such activity is established for your account.
Affiliate marketing, or promoting other products and services for a commission, can be started from the very beginning. You can promote products from Amazon and other established providers that have an affiliate revenue sharing model. In India, Flipkart also offer an affiliate marketing programme.
Direct advertising can work for websites in a specific niche that start getting a good traffic volume. If you know the right advertisers who might be interested in advertising their products on your website, you can approach them directly via email or phone. However, direct advertising can be trick for small blogs/websites.
Selling ebooks & courses on your website can be easily executed. All you have to do is create a useful ebook or course related to your niche that solves user problems. Offer this course or ebook for a fee.
Once you have matured as a blogger, you will find more ways to monetize your website such as member-only content, paid membership forums, online and offline seminars, offering consultancy services, etc. Don’t shy from hard work in the beginning of your blogging career. Work hard for the first few months and you will start reaping success. Best of luck!





One response to “How to Start a Blog / Website & Make Money Online Blogging in India? Start Earning Rs 15,000 – 15,00,000 / Month Working from Home”
I was looking for the best way to make money from home in India. Glad that I found this website. Keep sharing more informative articles.